
The Omega2+ as a network implant
Some time ago in 2016 I backed a Kickstarter for the Omega2 board. This is a tiny Linux powered computer meant for IoT development. I had plans to make cool things with it at the time, but the reality of it was that the Omega2+ ended up in my closet to be forgotten. Fast forward to 2020, we’re in the middle of a pandemic, I’m on vacation looking for things to do, and now seemed like a good time to put the Omega2+ to use.
I’d been wanting to make something similar to Hak5’s LAN Turtle and Shark Jack. With that in mind, I decided to turn the Omega2+ into a network implant. The end result is a device that plugs into a network drop of a target LAN and acts as a WiFi access point. By associating with the Omega2+ via WiFi, we can then SSH into it and perform scans on the target LAN.
This is super easy to do, no soldering required or any of that mess. Just buy the components and put them together like LEGO pieces.
Here’s what the end result looks like:
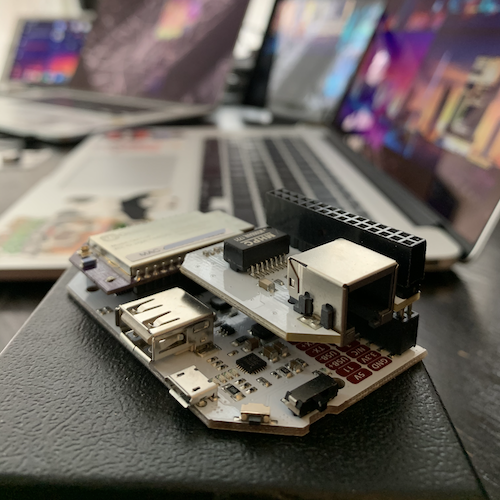
This includes the following components:
- Omega2+
- Expansion Dock
- Ethernet Expansion
- 32GB microSD card
The total cost without the microSD is $43.00.
The Omega2+ has 128MB of DDR2RAM and 32MB of flash storage. 32MB didn’t seem like a lot, so I purchased a 32GB microSD to increase the storage space. The Omega2+ also comes with one USB 2.0 port so you can use that for storage if you like. Here are the specs:
- 580MHz MIPS CPU
- 128MB Memory
- 32MB Storage
- USB2.0 support
- 2.4GHz b/g/n WiFi
- 3.3V Operating Voltage
- 18 GPIOs
- Support for UART, I2C, SPI
- MicroSD slot
Initial setup
Let’s get started. Setup the Omega2+ according to the instructions here. To summarize:
- Insert the microSD card to the base of the Omega2+
- Attach the Omega2+ and the Ethernet Expansion to the Expansion Dock
- Plug the Omega2+ to a power source like a laptop and switch it on
- It will act as an access point and broadcast a SSID in the form of Omega-ABCD, where ABCD is the last four digits of the Omega2+’s MAC address. The WiFi password is 12345678
- Browse to http://192.168.3.1 and follow the setup wizard. The username is
root, password isonioneer - Make sure you associate the Omega2+ with your WiFi access point and that it has Internet access
- Once completed, you’ll be dropped into the OnionOS dashboard
At any time, you can SSH directly into the Omega2+ with the root credentials:
Once logged in, verify that you have Internet access by pinging a server like 8.8.8.8 and google.com. If everything checks out, you probably want to change the default root and access point passwords. The root password can be changed using passwd as usual.
To change the access point password, run the following commands:
root@Omega-ABCD:~# uci set wireless.ap.key='my_new_password'
root@Omega-ABCD:~# uci commit wireless
root@Omega-ABCD:~# wifi
This will disconnect you from the access point, so you’ll want to reconnect before proceeding.
Booting from the microSD card
The Omega2+ doesn’t come with a lot of storage, so you’ll want to boot from an external storage. In my case, I’m using a microSD card so I can keep the single USB port available, so my instructions will cover preparing the microSD card. If you want to use a USB drive instead, follow the instructions here.
A quick check on the available space using df -h shows that the Omega2+ only has about 22MB of storage:
overlayfs:/overlay 22.1M 2.6M 19.4M 12% /
I’m using a 32GB microSD, so at the end of this, /overlay should have approximately that much space.
Start by installing e2fsprogs:
root@Omega-ABCD:~# opkg update
root@Omega-ABCD:~# opkg install e2fsprogs
The microSD device is /dev/mmcblk0p1 and should be mounted in /mnt/mmcblk0p1. Unmount and create an Ext4 file system on it:
root@Omega-ABCD:~# umount /mnt/mmcblk0p1
root@Omega-ABCD:~# mkfs.ext4 /dev/mmcblk0p1
mke2fs 1.44.1 (24-Mar-2018)
/dev/mmcblk0p1 contains a ext4 file system
    last mounted on /sd on Sat Mar 28 04:33:36 2020
Proceed anyway? (y,N) y
Creating filesystem with 7392768 4k blocks and 1851392 inodes
Filesystem UUID: e6052419-f5bc-4d92-8e04-04438b70d76a
Superblock backups stored on blocks:
    32768, 98304, 163840, 229376, 294912, 819200, 884736, 1605632, 2654208,
    4096000

Allocating group tables: done
Writing inode tables: done
Creating journal (32768 blocks): done
Writing superblocks and filesystem accounting information: done
Remount it back into /mnt/mmcblk0p1
root@Omega-46DB:~# mkdir -p /mnt/mmcblk0p1
root@Omega-46DB:~# mount /dev/mmcblk0p1 /mnt/mmcblk0p1
Now move /overlay into the microSD:
root@Omega-46DB:~# mount /dev/mmcblk0p1 /mnt ; tar -C /overlay -cvf - . | tar -C /mnt/ -xf - ; umount /mnt/
./
./upper/
./upper/etc/
./upper/etc/config/
./upper/etc/config/rpcd
./upper/etc/config/onion
./upper/etc/config/fstab
./upper/etc/config/ubootenv
.
.
.
Now save the current configuration to /etc/config/fstab:
root@Omega-ABCD:~# block detect > /etc/config/fstab
Edit the file and change this:
config 'mount'
        option  target  '/dev/mmcblk0p1'
        option  uuid    'e6052419-f5bc-4d92-8e04-04438b70d76a'
        option  enabled '0'
to the following:
config 'mount'
        option  target  '/overlay'
        option  uuid    'e6052419-f5bc-4d92-8e04-04438b70d76a'
        option  enabled '1'
Reboot the device. Log back in, run df -h, and you should now see that storage has increased:
overlayfs:/overlay 27.6G 50.4M 26.2G 0% /
Installing additional tools
As a backdoor, you’ll want the Omega2+ to be able to connect back to your server when it gets plugged into the LAN perform scans and attacks. You’ll probably want to start by installing tools such as nmap-ssl, autossh, ncat, python3, python3-pip, and git.
These aren’t found in the Omega2 repository so you’ll need to enable the respositories they’re stored in. Edit /etc/opkg/distfeeds.conf and uncomment the following repositories:
src/gz openwrt_core http://downloads.openwrt.org/releases/18.06-SNAPSHOT/targets/ramips/mt76x8/
src/gz openwrt_base http://downloads.openwrt.org/releases/18.06-SNAPSHOT/packages/mipsel_24kc/b
src/gz openwrt_packages http://downloads.openwrt.org/releases/18.06-SNAPSHOT/packages/mipsel_24
Save the file and update:
root@Omega-ABCD:~# opkg update
You can now install tools like nmap-ssl:
root@Omega-ABCD:~# opkg install nmap-ssl
Installing nmap-ssl (7.70-1) to root...
Downloading http://downloads.openwrt.org/releases/18.06-SNAPSHOT/packages/mipsel_24kc/packages/nmap-ssl_7.70-      1_mipsel_24kc.ipk
Multiple packages (libstdcpp and libstdcpp) providing same name marked HOLD or PREFER. Using latest.
Configuring nmap-ssl.
To install git, you’ll need to install three packages:
root@Omega-ABCD:~# opkg install git git-http ca-bundle
An index of all packages you can install with opkg can be found at https://openwrt.org/packages/index/start.
Testing it
To test it, I plugged the Omega2+ to a power source and a router. Once it had powered on, I connected to it via WiFi and established a reverse SSH tunnel to my server. From my server, I created a SSH SOCKS5 proxy to the Omega2+, which allowed me to use proxychains to scan the target LAN the Omega2+ was connected to.
Here’s a scan of a Metasploitable instance running on my LAN:
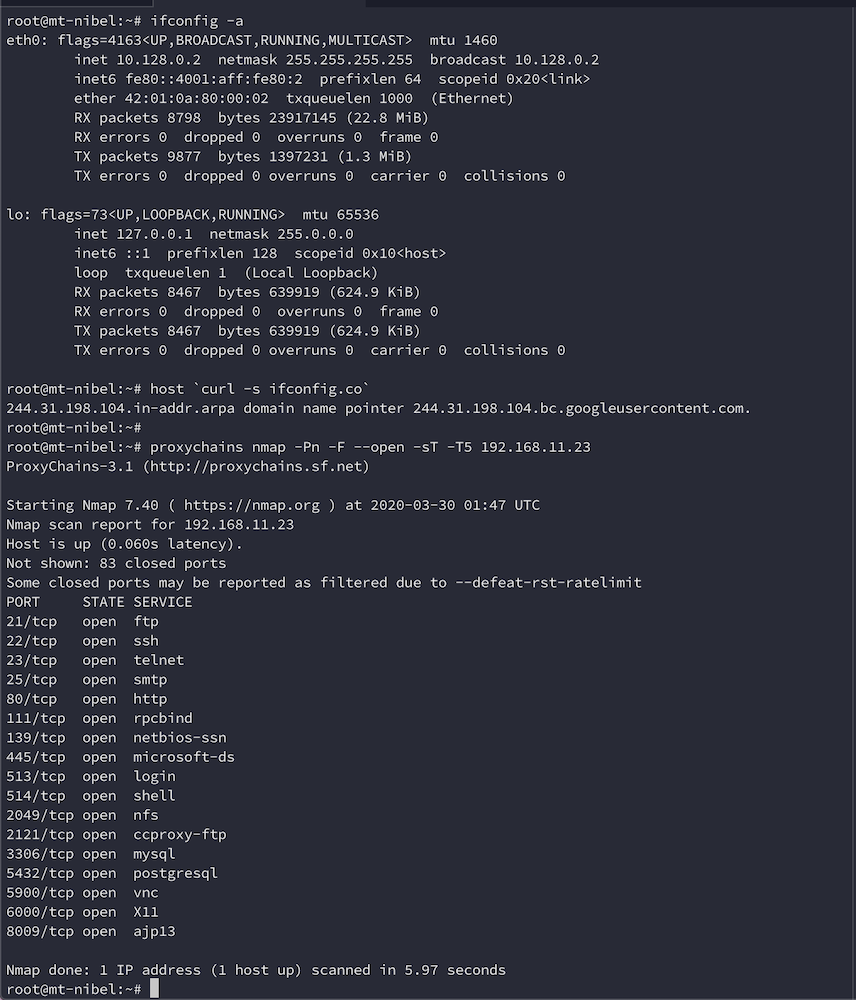
Not too shabby!
Conclusion
I put this thing together as a proof of concept that had the potential to perform like Hak5’s LAN Turtle and Shark Jack. While more testing is required, it appears to work the way it should. If you’d like an alternative to Hak5’s network implants, then give the Omega2+ a go. When you’re done using it as a network implant, you can always repurpose it for other things.