
Radare 2 in 0x1E minutes
Radare is an open source reversing framework. It comes with a ton of options, functionality, and a somewhat daunting learning curve. I primarily use it for CTF challenges, and I love that I can run it on a terminal along side GDB without requiring a GUI. It’s a powerful tool, and so I’ve come up with this guide to give people a kick start to the path of reversing with Radare. We’ll go through a workflow to reverse engineer a simple binary with Radare to get you familiar with some of Radare’s features.
Obviously, you’ll need to install Radare first. Radare has pre-built packages for Linux, OS X, Windows, iOS, and Android. Alternatively, you can grab the latest release from their GitHub repository. The best way to learn is to just dive in, so grab mystery.bin and follow along. I’ll be using a lot of commands within Radare, and if you need more information on a particular command, just add a ? at the end of it for a description. For example, p? will tell you what the p series of commands do.
File information
Let’s run the binary and see what we’re up against:
$ ./mystery.bin
Enter password: foobar
Got [foobar]
Fail!
It prompts us for a password, and if we get it wrong, it prints out “Fail!”. We’ll load it up in Radare using the r2 command:
$ r2 mystery.bin
[0x004004b0]>
The address in the prompt is the current location the cursor is on. As we’ll see later, we can move this cursor around. Some of Radare’s commands require us to specify a memory location to work on, and if the location isn’t specified, it defaults to the one the cursor is currently on. We can get some information on the file using the iI command:
[0x004004b0]> iI
pic      false
canary   false
nx       true
crypto   false
va       true
intrp    /lib64/ld-linux-x86-64.so.2
bintype  elf
class    ELF64
lang     c
arch     x86
bits     64
machine  AMD x86-64 architecture
os       linux
minopsz  1
maxopsz  16
pcalign  0
subsys   linux
endian   little
stripped true
static   false
linenum  false
lsyms    false
relocs   false
rpath    NONE
binsz    3257

[0x004004b0]>
Lots of information here. The first three lines tell us that it has no PIE, stack canary, but has NX enabled; useful information if this were a pwnable challenge that we needed to exploit. It also tells us that it’s a stripped 64-bit ELF binary. We can grep for specific strings in the output too using the ~ operator. So if we just want to see if the binary has NX:
[0x004004b0]> iI~nx
nx       true
To find the binary’s entry point, as well as main’s address, we can use the ie and iM commands respectively:
[0x004004b0]> ie
[Entrypoints]
vaddr=0x004004b0 paddr=0x000004b0 baddr=0x00400000 laddr=0x00000000

1 entrypoints

[0x004004b0]> iM
[Main]
vaddr=0x00400692 paddr=0x00000692

[0x004004b0]>
vaddr is the address of the entry point and of the main. The next thing we might be interested in are symbols in the binary. This can be examined with the is command:
[0x004004b0]> is
[Symbols]
vaddr=0x00400460 paddr=0x00000460 ord=001 fwd=NONE sz=16 bind=GLOBAL type=FUNC name=imp.puts
vaddr=0x00400470 paddr=0x00000470 ord=002 fwd=NONE sz=16 bind=GLOBAL type=FUNC name=imp.printf
vaddr=0x00400480 paddr=0x00000480 ord=003 fwd=NONE sz=16 bind=GLOBAL type=FUNC name=imp.__libc_start_main
vaddr=0x00400000 paddr=0x00000000 ord=004 fwd=NONE sz=16 bind=UNKNOWN type=NOTYPE name=imp.__gmon_start__
vaddr=0x00400490 paddr=0x00000490 ord=005 fwd=NONE sz=16 bind=GLOBAL type=FUNC name=imp.__isoc99_scanf
Here we see references to puts, printf, and scanf.
We know the binary prints out “Fail!” when the incorrect password is provided. What other strings could it have? To check, we can use the iz command:
[0x004004b0]> iz
vaddr=0x004007b4 paddr=0x000007b4 ordinal=000 sz=17 len=16 section=.rodata type=ascii string=Enter password:
vaddr=0x004007c8 paddr=0x000007c8 ordinal=001 sz=10 len=9 section=.rodata type=ascii string=Got [%s]\n
vaddr=0x004007d2 paddr=0x000007d2 ordinal=002 sz=5 len=4 section=.rodata type=ascii string=Win!
vaddr=0x004007d7 paddr=0x000007d7 ordinal=003 sz=6 len=5 section=.rodata type=ascii string=Fail!
We can also use the / operator to look for specifc strings, or bytes:
[0x004004b0]> / Win
Searching 3 bytes from 0x00400000 to 0x00600ba0: 57 69 6e
Searching 3 bytes in [0x400000-0x600ba0]
hits: 1
0x004007d2 hit2_0 "Win"
Obviously we want to see the “Win!” message get printed, and that’s the whole point of this reversing exercise. To find out where it’s being referenced from, we need to analyze all the functions first using the aaa command. Once that’s done, we can use the axt command:
[0x004005ed]> aaa
[0x004005ed]> axt 0x004007d2
data 0x400704 mov edi, str.Win_ in main
Here we see that it’s being used in main. Aside from variables, axt can be also be used to find references to a function. For example, to find functions that call printf:
[0x004005ed]> axt sym.imp.printf
call 0x4006b2 call sym.imp.printf in main
call 0x4006de call sym.imp.printf in main
So far so good. We’ve identified a “Win!” message we want to end up in, and we know which function is referencing it.
Working with functions
The next step is to have a look at what functions are available in the binary. As before, we need to analyze all the functions first using aaa. Then we can use the afl command to list all analyed functions:
[0x004004b0]> aaa
[0x004004b0]> afl
0x004004b0  42  1  entry0
0x00400480  16  2  sym.imp.__libc_start_main
0x00400692  143  5  main
0x00400460  16  2  sym.imp.puts
0x00400470  16  2  sym.imp.printf
0x00400490  16  2  sym.imp.__isoc99_scanf
0x004004e0  50  4  fcn.004004e0
0x00400664  46  4  fcn.00400664
0x004005a6  190  15  fcn.004005a6
0x00400428  26  3  fcn.00400428
0x004004a0  16  1  sub.__libc_start_main_4a0
Several functions have been analyzed, and we can disassemble them using the pdf command. Let’s start by analyzing main since it references the “Win!” string we’re interested in. We can use the command pdf@main to disassemble it. Alternatively, we can seek to main’s location first, and then run pdf without having to provide @main. As I mentioned earlier, Radare’s prompt shows the address of where the cursor is currently located. Seeking allows us to change the current location, so that commands will apply to the current location. Otherwise, we would need to use the @address syntax. Seeking is done with the s command:
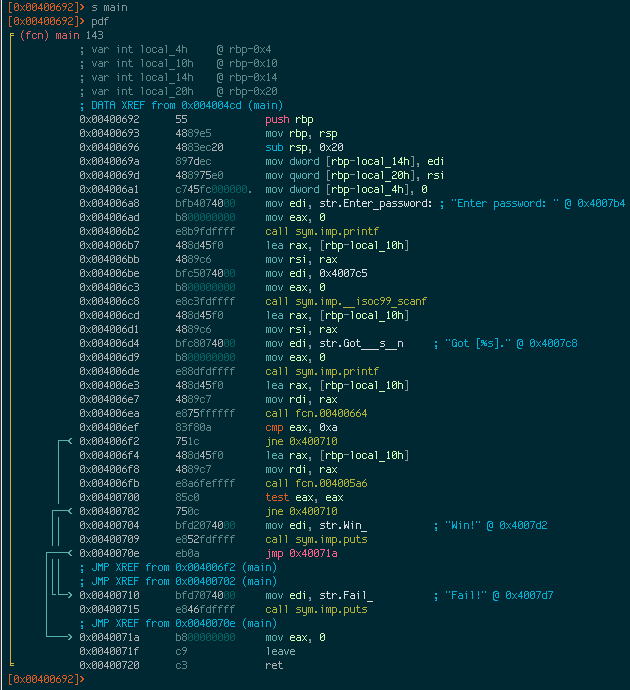
The first column shows the address of each instruction, the second column shows the opcodes of the instruction, and the third column shows the instruction itself. A fourth column exists to display any available comments. It’s also possible to display only a certain number of instructions using the pd command. For instance, to display the first 10 lines of main, you could do pd 10. The arrows on the left of the addresses depict where execution branches off to when a jump instruction is encountered.
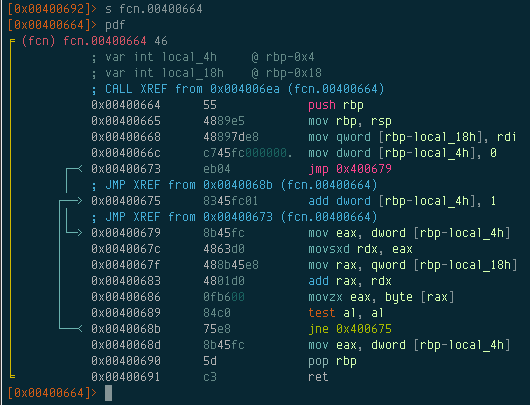
At 0x004006ea, main calls a function fcn.00400664. We can see that a value is moved to RDI before the function is called. This implies that it takes an argument; and in this case, it’s the password that we enter. Let’s examine this function.
So at first glance, we can see that
- Radare identified two local variables, local_4h, and local_18h.
- There are two branching conditions in the function.
Let’s see if we can figure out what these local variables are. The first reference to local_18h occurs at 0x00400668:
mov qword [rbp-local_18h], rdi
We know RDI contains the password we input, so it would seem that local_18h is a copy of that password. Right after that, we see that local_4h is set to 0:
mov dword [rbp-local_4h], 0
After initializing it to 0, execution jumps to 0x00400679 and proceeds to 0x0040068b. At this point, it performs several instructions which basically checks to see if the first character in the password is a null byte. If it isn’t, then it jumps back to 0x400675. local_4h is then incremented by 1:
add dword [rbp-local_4h], 1
It then takes the second character in the entered password and repeats over again until it eventually finds a null byte, at which point it returns the value in local_4h to the calling function. So it’s safe to assume that local_4h must be a loop counter, and this function’s purpose is to simply check the length of the entered password.
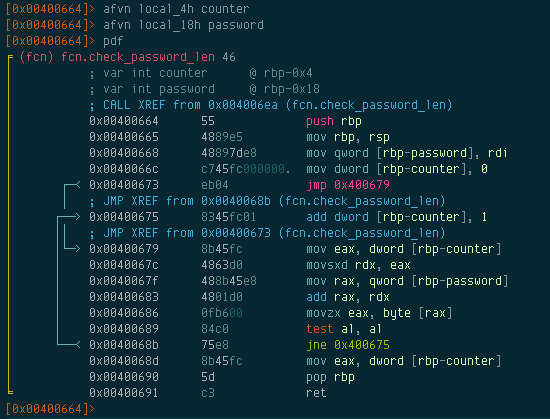
Radare allows us to rename functions and variables to things that make sense to us. First of all, let’s rename the function to check_password_len. We can do this with the afn command:
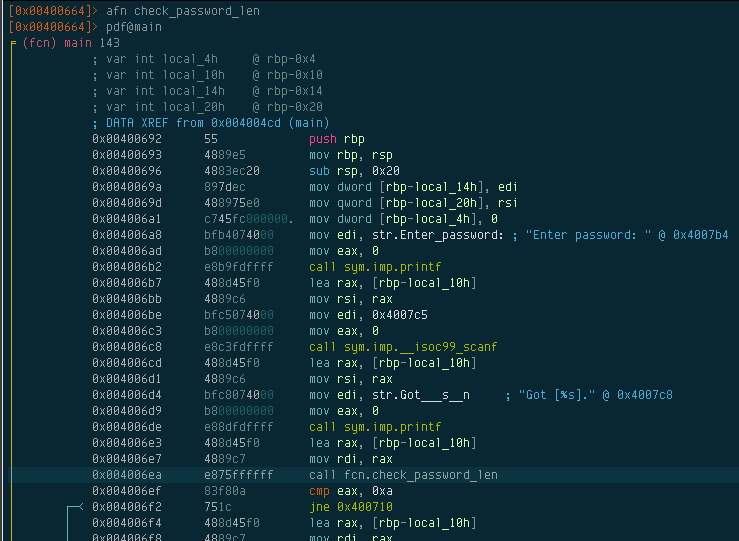
After renaming the function, all references to that function will now show fcn.check_password_len. To rename the variables, we can use afvn:
Graphs
Now that we have a better understanding of what check_password_len does, let’s move on to the next function; fcn.004005a6.
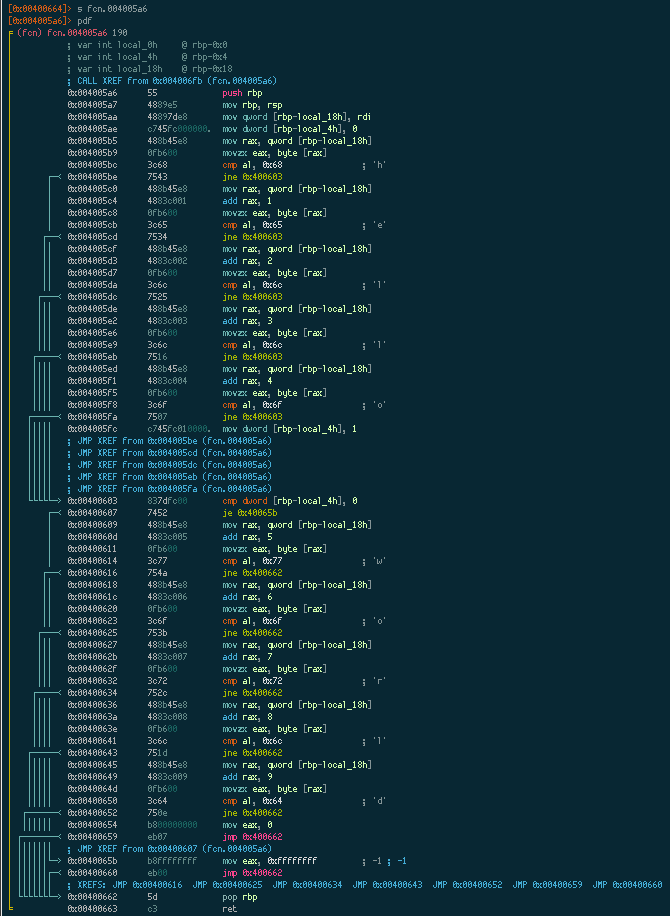
Look at all those arrows! There’s a lot of branching going on, so let’s switch to Radare’s visual mode to see a graph of what’s happening. Use the VV command to enter visual mode:
Radare displays an ASCII graph of the function being analyzed. Now we can clearly see where the branching is taking place. Notice that Radare also puts a “t” and “f” under each condition to signify “true” and “false” respectively. Visual mode has its own set of commands, such as:
hjkl- scroll canvasHJKL- move nodetab/TAB- select next/previous nodet/f- follow true/false edges.- center the graphp- press repeatedly to change graph view
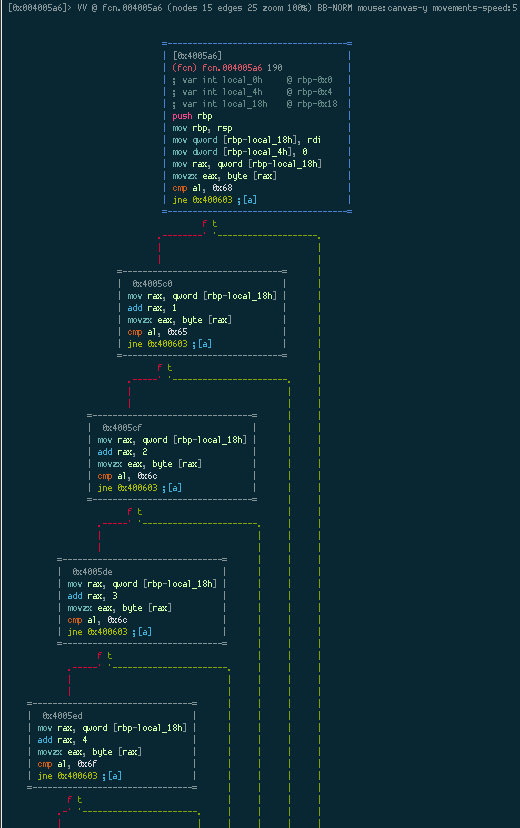
We can scroll down the graph using h, but it’s a fairly large graph. If we press p several times, we eventually get a mini-graph view:
Now we can see the full graph and where the branching is taking place. Using tab, we can move to the next node and Radare will display the instructions in that node on the top left corner. The graph depicts a series of nested if conditions where it checks to see if each character in the password we provided, matches a certain character. So basically, this function returns 0 if our input matches the expected password.
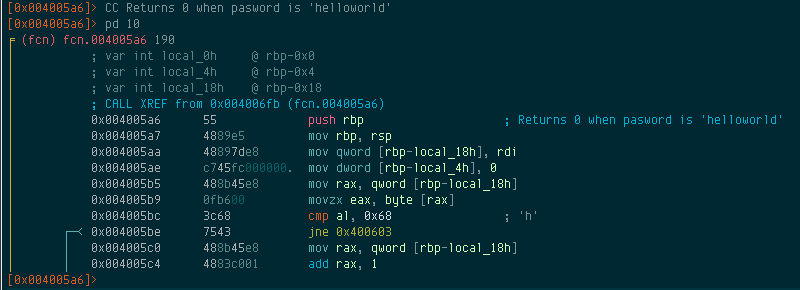
Adding comments
We know what fcn.004005a6 does now. We can rename it to check_password, and we can even add a comment. Adding comments to the code can make it easier to understand. In fact, Radare already does some of this for us. If you look back at the disassembly for fcn.004005a6, it actually tells you what characters it’s checking our input against. This function expects the password to be “helloworld” for it to return a 0. So let’s add a comment using the CC command:
We’ve solved this easy binary challenge. Let’s see it in action:
$ ./mystery.bin
Enter password: helloworld
Got [helloworld]
Win!
Patching
Let’s step back into main’s disassembly and have a look at what we have now. I’ve added some comments to main itself as well as renamed fcn.004005a6 to check_password.

Now suppose that we wanted any 10 character password to be valid. We can do that by removing the jump at 0x00400702 so that regardless of what check_password returns, it will always go to the branch that prints the “Win!” message. We can patch the binary using the w series of commands. This can be especially handy when you want to remove calls to fork, alarm, ptrace, to make debugging easier. We’ll replace the jne 0x400710 instrction with two nop instructions. To do this:
- Re-open the binary with read-write permissions. This can be done with the
oo+command. - Seek to the address to patch.
- Write the patch to the binary using the
wset of commands. - Re-open the binary in read-only mode with the
oocommand.
In this case, we’ll use wx 9090 to replace the jne 0x400710 with nop;nop:
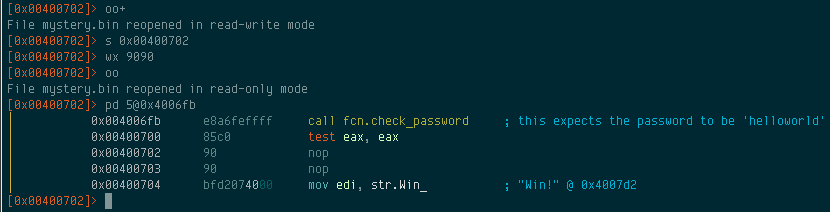
Issuing the wx command will apply the changes immediately. The jump instruction has been removed, so running the binary with any 10 character password will now result in a win:
$ ./mystery.bin
Enter password: aaaaaaaaaa
Got [aaaaaaaaaa]
Win!
Final thoughts
Hopefully this guide has given you a taste of Radare’s potential. Other things it can do include debugging the binary, looking for ROP gadgets, importing signatures, and so on. Radare also offers a help system, just type ? to get a list of commands. From there you can drill down, so if you want to know what other options pd has for instance, just do pd?. Radare comes with a host of other standalone binaries such as rdiff2, rax2, and rasm2. If you’ve found Radare interesting so far, I encourage you to play around with it some more. Download some binary challenges and take Radare to town.